Two years ago I wrote about creating a simple Four In A Row game with boardgame.io. It continues to get some traffic, despite being somewhat outdated due to continued improvements to the boardgame.io framework. As such, I thought it would be a good time to revisit the framework again with a new game, Yatzy.
At a minimum I will make the following improvements over my previous game:
- Build a more complicated rules engine with multiple moves and dynamic scoring
- Use the latest boardgame.io framework available (
0.35.1, at the time of writing) - Support a variable number of players (1-4)
- Introduce an element of randomness (rolling dice)
- Cleaner UI with Bootstrap 4
- Use TypeScript
Over time I may add additional features or leverage more framework features, if there is any interest.
Read on for a technical breakdown of the game, or simply check out the source code on GitHub or play the game yourself!
Fair warning: this guide is not intended to be a complete step-by-step guide. As with any app there is quite a bit of relatively boring boilerplate that I will gloss over, predominately around the user interface. I will focus on the areas that are specific to boardgame.io, while also providing the source code that will allow you to fill in any blanks yourself. The rest of this blog assumes you have at least skimmed the boardgame.io documentation and also assumes an existing knowledge of JavaScript, React, npm and related web development technologies.
At the end of this guide we will have a complete game of Yatzy that supports 1 to 4 players on a single device.
Getting started
I’m going to use Create React App as the foundation of our app, as it takes care of a lot of the boilerplate for us.
npx create-react-app yatzy --template typescript # Create our base app with TypeScript
cd yatzy/                                        # Navigate to our new app directory
npm install --save boardgame.io                  # Install boardgame.io, the framework for our game
npm install --save bootstrap                     # Install bootstrap for our UI
npm install --save react-bootstrap               # Install react-bootstrap to leverage bootstrap
npm install --save styled-components             # Install styled-components for styling
npm install --save-dev @types/styled-components  # Install TypeScript typings for styled-components
npm install --save lodash                        # Install lodash to help with our game engine
npm install --save-dev @types/lodash             # Install TypeScript typings for lodash
npm install --saved mdi-react                    # Install mdi-react for some dice icons
npm start                                        # Start the game to ensure it is functioning correctly
You should now see the default Create React App landing page.
Creating the initial game client
With our base app in place, we can now start looking at forming the basis of our game client. Let’s start by replacing the default app with our game client provided by boardgame.io.
// App.tsx
import React from 'react';
import createClient from './components/Game';
import 'bootstrap/dist/css/bootstrap.min.css';

const App: React.FC = () => {
  const Client = createClient();
  return (
    <div>
      <Client />
    </div>
  );
}

export default App;
// /components/Game.tsx
import Board from './Board';
let BgReact = require('boardgame.io/react');

const createGame = () => {
  return {
    name: 'Yatzy',
    setup: () => {
      return ({
      });
    },
    moves: {
    },
    endIf: (G: any, ctx: any) => {
    }
  };
}

const createClient = () => {
  return BgReact.Client({
    game: createGame(),
    numPlayers: 1,
    board: Board,
    debug: false
  });
}

export default createClient;
// /components/Board.tsx
import React from 'react';

interface BoardProps {
}

const Board: React.FC<BoardProps> = () => {

  return (
    <h1>
        Yatzy
    </h1>
  );
}

export default Board;
As you can see, this is the bare minimum with no real UI and no setup or moves defined.
Something interesting that differs from the boardgame.io tutorial is that Game.tsx exports a function called createClient and not the client itself. This will be useful later on when we want to supply different parameters to each instance of our game, such as the number of people who will be playing.
Defining our game state and rules
With our empty game client in place, we can now move on to the interesting part: defining our game state and the moves that can modify it. I think TypeScript really shines here as it will make our intentions much clearer.
Our game state is responsible for exactly that; defining the state of our current game. By creating TypeScript types for it we make it clear what the possible, valid states of the game are.
It is important to take time to think about your particular game and the various properties of that game. Using our Yatzy example, the game could be described as having the following properties:
- A variable number of players, each with their own scorecard.
- 5 dice with 6 sides each, that may be held or re-rolled.
- A limit to the number of times a dice can be rolled per turn.
With this in mind, I have decided on the following game state. It is not necessarily the best way to represent the game, but it should make it fairly easy to understand and interact with.
// /types/GameState.ts
import { Player } from './Player';

export interface GameState {
  dice: number[]; // An array of 5 6-sided die
  diceHeld: boolean[]; // An array 5 booleans indicating whether that die is currently being held
  totalRolls: number; // The number of times the dice have been rolled on the current turn
  players: Player[]; // An array of players taking part in the game
}
As with any game, there are many ways to define the state of the game. The more complicated the game, the more state it is likely to have and the more ways there are to represent that state. For example, we could have combined dice and diceHeld in to a single object containing both the value of the die and the “held status”; we could have assigned each player their own set of dice, and so on.
As it stands, our game state uses primitive TypeScript types with the exception of our player, which looks like this:
// /types/Player.ts
import { ScoringCategory } from './Scoring';

export interface Player {
  id: string; // The id of our player
  name: string; // The name of our player
  scoring: Record<ScoringCategory, number | null>; // A record of the categories a player can score in. The category may have been scored (number) or is yet to be scored (null)
}
// /types/Scoring.ts
export type ScoringCategory =
  'ones' | 'twos' | 'threes' | 'fours' | 'fives' | 'sixes' |
  'onePair' | 'twoPairs' | 'threeOfAKind' | 'fourOfAKind' |
  'smallStraight' | 'largeStraight' | 'fullHouse' | 'chance' |
  'yatzy' // The categories a player may score in

export type ScoringSection = 'Upper' | 'Lower'; // A category may be in the upper or lower sections

export interface ScoringCategoryDetails {
  category: ScoringCategory;
  name: string;
  description: string;
  section: ScoringSection;
}

// Provides supplemental information about each scoring category,
// such as a description of how the category is scored.
export const ScoringCategoryDescriptions: ScoringCategoryDetails[] = [
  {
    category: "ones",
    name: "Ones",
    section: "Upper",
    description: "The sum of all dice showing the number 1."
  },
  // ...truncated for brevity
We put all these pieces together to make the “shape” of our game. Now it’s time to think about how we want to modify that shape as we play the game.
In Yatzy, there are three different actions we might take during the game:
- Roll one or more dice
- Hold or unhold one or more dice
- Allocate the current dice to a single scoring category
We can now define moves for each of these actions:
rollDice: (G: GameState, ctx: GameContext) => {
    // Don't allow the dice to be rolled more than 3 times.
    if (G.totalRolls >= 3) return;

    // Roll a D6 for each dice that isn't being held.
    for (let d = 0; d < G.dice.length; d++) {
        if (!G.diceHeld[d]) G.dice[d] = ctx.random.D6();
    }
    G.totalRolls++;
},
As a reminder, each move takes G and ctx by default, and we can add additional custom parameters after that. For dice rolling we don’t need any additional parameters; we can determine which dice should be rolled directly from the current game state.
In addition to restricting moves on the UI, I also like to place restrictions in the move definition itself, in case of a UI bug. In this case we want to reject any dice roll after 3 rolls have taken place.
After that we can iterate through all the dice and assign a new value from 1-6 using the built-in randomness features. Finally, we increase the total number of rolls by 1.
toggleDie: (G: GameState, ctx: GameContext, dieIndex: number) => {
    // Don't allow the holding or unholding of die if the player hasn't rolled yet or has finished rolling
    if (G.totalRolls === 0 || G.totalRolls >= 3) return;

    // Flip from held to not held, or not held to held
    G.diceHeld[dieIndex] = !G.diceHeld[dieIndex];
}
I have named our hold/unhold action “toggle” to indicate it is used for both holding and unholding. This time we do accept a customer parameter called dieIndex, which indicates which die should be toggled.
Once again, we first check to see if the dice can be toggled; we only want to allow this after the first and second rolls. After that it’s as simple as flipping the boolean value for that die.
selectScore: (G: GameState, ctx: GameContext, category: ScoringCategory) => {
    // Don't allow the category to be selected if it's already been scored.
    if (G.players[ctx.currentPlayer].scoring[category] != null) return;

    // Calculate and allocate the correct score for the selected category
    const score = ScoreCalculator.calculators[category](G.dice);
    G.players[ctx.currentPlayer].scoring[category] = score;

    // Reset the state of the dice, then end the player's turn
    G.dice = Array(totalDice).fill(1);
    G.diceHeld = Array(totalDice).fill(false);
    G.totalRolls = 0;
    ctx.events.endTurn();
},
Our final action is also our most complicated. Firstly, we have to check that the selected category hasn’t been scored yet. If it hasn’t, we calculate the category score for the current set of dice and allocate it to the player. Then we reset the state of the dice and pass the turn to the next player.
The interesting part here is hidden away in the scoring. Because we are interested in scoring each category indepedently of the game engine (e.g. to show the user how many points their current dice are worth), I have created a separate object to encapsulate this logic. I will share a snippet of it here:
// /utils/ScoreCalculator.ts
export interface IScoreCalculator {
  calculateUpperSectionTotal: (player: Player) => number;
  calculateUpperSectionBonus: (player: Player) => number;
  calculateLowerSectionTotal: (player: Player) => number;
  calculateTotal: (player: Player) => number;
  calculators: Record<ScoringCategory, (dice: number[]) => number>;
}

export const ScoreCalculator: IScoreCalculator = {
  calculateUpperSectionTotal: (player: Player) => {
    const upperTotal = ScoringCategoryDescriptions
      .filter((scd) => scd.section === "Upper")
      .map((scd) => player.scoring[scd.category] ?? 0)
      .reduce((total, previous) => (total ?? 0) + (previous ?? 0)) ?? 0;
      return upperTotal;
  },
  calculateUpperSectionBonus: (player: Player) => {
    const upperTotal = ScoreCalculator.calculateUpperSectionTotal(player);
    const upperBonus = upperTotal >= 63 ? 50 : 0;
    return upperBonus;
  },
  calculateLowerSectionTotal: (player: Player) => {
    const lowerTotal = ScoringCategoryDescriptions
      .filter((scd) => scd.section === "Lower")
      .map((scd) => player.scoring[scd.category] ?? 0)
      .reduce((total, previous) => (total ?? 0) + (previous ?? 0)) ?? 0;
      return lowerTotal;
  },
  calculateTotal: (player: Player) => {
    const upperTotal = ScoreCalculator.calculateUpperSectionTotal(player);
    const upperBonus = ScoreCalculator.calculateUpperSectionBonus(player);
    const lowerTotal = ScoreCalculator.calculateLowerSectionTotal(player);;
    const finalTotal = upperTotal + upperBonus + lowerTotal;
    return finalTotal;
  },
  calculators: {
    "ones": (dice: number[]) => {
      // Sum all dice showing 1
      return sum(dice.filter((d) => d === 1));
    },
    "twos": (dice: number[]) => {
      // Sum all dice showing 2
      return sum(dice.filter((d) => d === 2));
    },
    // ... truncated for brevity
  }
}
We have separate functions to calculate the upper total, upper bonus, lower total and grand total respectively, and individual categories for each calculator. By using an interface and a Record type for our individual calculators, we ensure that all categories have a valid calculator specified, otherwise a compile time error will occur.
With some help from lodash each individual calculator is relatively straightforward. What really helps here is unit tests to ensure our calculators return the right results.
// /utils/ScoreCalculator.test.ts

import { ScoreCalculator } from "./ScoreCalculator";
import { Player } from "../types/Player";

describe('ScoringCalculator', () => {

  describe('Ones', () => {

    const calculate = ScoreCalculator.calculators['ones'];

    test('calculates no ones correctly', () => {
      const dice = [2, 3, 4, 5, 6];
      expect(calculate(dice)).toBe(0);
    });

    test('calculates two ones correctly', () => {
      const dice = [1, 1, 4, 5, 6];
      expect(calculate(dice)).toBe(2);
    });

    test('calculates all ones correctly', () => {
      const dice = [1, 1, 1, 1, 1];
      expect(calculate(dice)).toBe(5);
    });

  });
  // ...truncated for brevity
}
You can see all the calculators and all the tests on GitHub.
Completing the game client
With our game state and moves defined, we can now complete the remainder of our game client, notably our initial setup and our win condition.
import max from 'lodash/max';
import Board from './Board';
import { Player } from '../types/Player';
import { GameState } from '../types/GameState';
import { ScoringCategory } from '../types/Scoring';
import { ScoreCalculator } from '../utils/ScoreCalculator';
import { GameContext } from '../types/GameContext';
let BgReact = require('boardgame.io/react');

const createInitialScores = () => {
  return {
    ones: null,
    // ...truncated for brevity
  };
};

const createGame = (numberOfPlayers: number) => {
  const totalDice = 5;

  return {
    name: 'Yatzy',
    setup: () => {
      const players: Player[] = [];
      for (let p = 0; p < numberOfPlayers; p++) {
        players.push({
          id: p.toString(),
          name: "Player " + (p+1),
          scoring: createInitialScores()
        });
      }

      const dice = Array(totalDice).fill(1);
      const diceHeld = Array(totalDice).fill(false);
      const totalRolls = 0;

      return ({
        dice,
        diceHeld,
        players,
        totalRolls
      });
    },
    moves: {
      // ...truncated for brevity
    },
    endIf: (G: GameState, ctx: GameContext) => {
      // If all players have all scoring categories set, the game is over
      const gameIsOver = G.players.every((p) => {
        return Object.keys(p.scoring).every((category) => {
          const scoringCategory = category as ScoringCategory;
          return p.scoring[scoringCategory] != null;
        })
      });
      if (gameIsOver) {
        // Calculate scores and determine the winner
        const scores = G.players.map((p) => ScoreCalculator.calculateTotal(p));
        const topScore = max(scores) ?? 0;
        if (scores.filter((score) => score === topScore).length >= 2) {
          return { draw: true }
        } else {
          const winner = G.players[scores.indexOf(topScore)]
          return { winner: winner.id };
        }
      }
    }
  };
}

const createClient = (numberOfPlayers: number) => {
  return BgReact.Client({
    game: createGame(numberOfPlayers),
    numPlayers: numberOfPlayers,
    board: Board,
    debug: false
  });
}

export default createClient;
There is quite a bit to break down here, so I’ll try and cover the important bits.
- Our
createClientfunction now accepts anumberOfPlayersparameter. - We have defined the
setupfunction of our game, in which we create aPlayerobject for each player and set initial values fordice,diceHeldandtotalRolls. - We have defined the
endIffunction of our game. The game is considered over when all players have assigned a score for all their scoring categories. Once the game is over, we calculate the total number of points scored by each player and declare them the winner.
Our game client is now complete!
Selecting the number of players
Now that we support a dynamic number of players, we need a way for the user to select the number of players. For this, we need to revisit our original App component while also creating a new Setup component.
// App.tsx
import React, { useState } from 'react';
import createClient from './components/Game';
import 'bootstrap/dist/css/bootstrap.min.css';
import Setup from './components/Setup';


const App: React.FC = () => {
  const [playerCount, setPlayerCount] = useState<number | null>(null);

  const handleSelection = (numberOfPlayers: number) => {
    setPlayerCount(numberOfPlayers);
  }

  let Client;
  if (playerCount) {
    Client = createClient(playerCount);
  }

  return (
    <div>
      {
          Client ?
            <Client /> :
            <Setup handleSelection={handleSelection} />
        }
    </div>
  );
}

export default App;
// /components/Setup.tsx
import React from 'react';
import { Button, Container, Row, Col } from 'react-bootstrap';
import styled from 'styled-components';
interface SetupProps {
handleSelection: (numOfPlayers: number) => void;
}
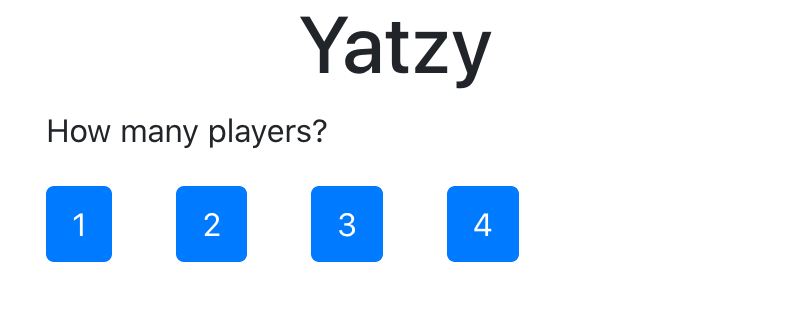
const Setup: React.FC<SetupProps> = ({ handleSelection }) => {
return (
<Container>
<Row>
<Col xs={12} md={4}>
<StyledHeader>Yatzy</StyledHeader>
<p>How many players?</p>
<StyledButton onClick={() => handleSelection(1)}>1</StyledButton>
<StyledButton onClick={() => handleSelection(2)}>2</StyledButton>
<StyledButton onClick={() => handleSelection(3)}>3</StyledButton>
<StyledButton onClick={() => handleSelection(4)}>4</StyledButton>
</Col>
</Row>
</Container>
);
};
const StyledHeader = styled.h1`
text-align: center;
`;
const StyledButton = styled(Button)`
margin-right: 2em;
`;
export default Setup;
This time we’ve added a nullable state value playerCount to our App. If it hasn’t been set, we display an initial setup page where the user can choose the number of players. On selection, a callback is made to set the player count, at which point the setup page is replaced with our boardgame.io game client.
If we wanted we could replace this primitive state type with a more complicated object to store other config such as custom names for each player, but this would also require a more complicated setup form.
Completing our User Interface
The final (and most time consuming) step is to complete the rest of our User Interface (UI). There’s no shortcuts or magic advice I can offer here; any game will take time and effort to create a decent UI. Fortunately there’s nothing specical required by boardgame.io - we can use standard React components with the appropriate HTML/CSS/JavaScript, but such skills are essential and out of scope for this particular guide.
The complete UI can be browsed on GitHub. The two most important components are:
- Board.tsx - our primary UI container. Renders all the other components including the dice, scorecard and information about the current game.
- Scorecard.tsx - the Yatzy scorecard. Renders information about each player, their current score and handles the allocation of dice to scoring categories.
Playing the game
Let’s take a look at out finished game.
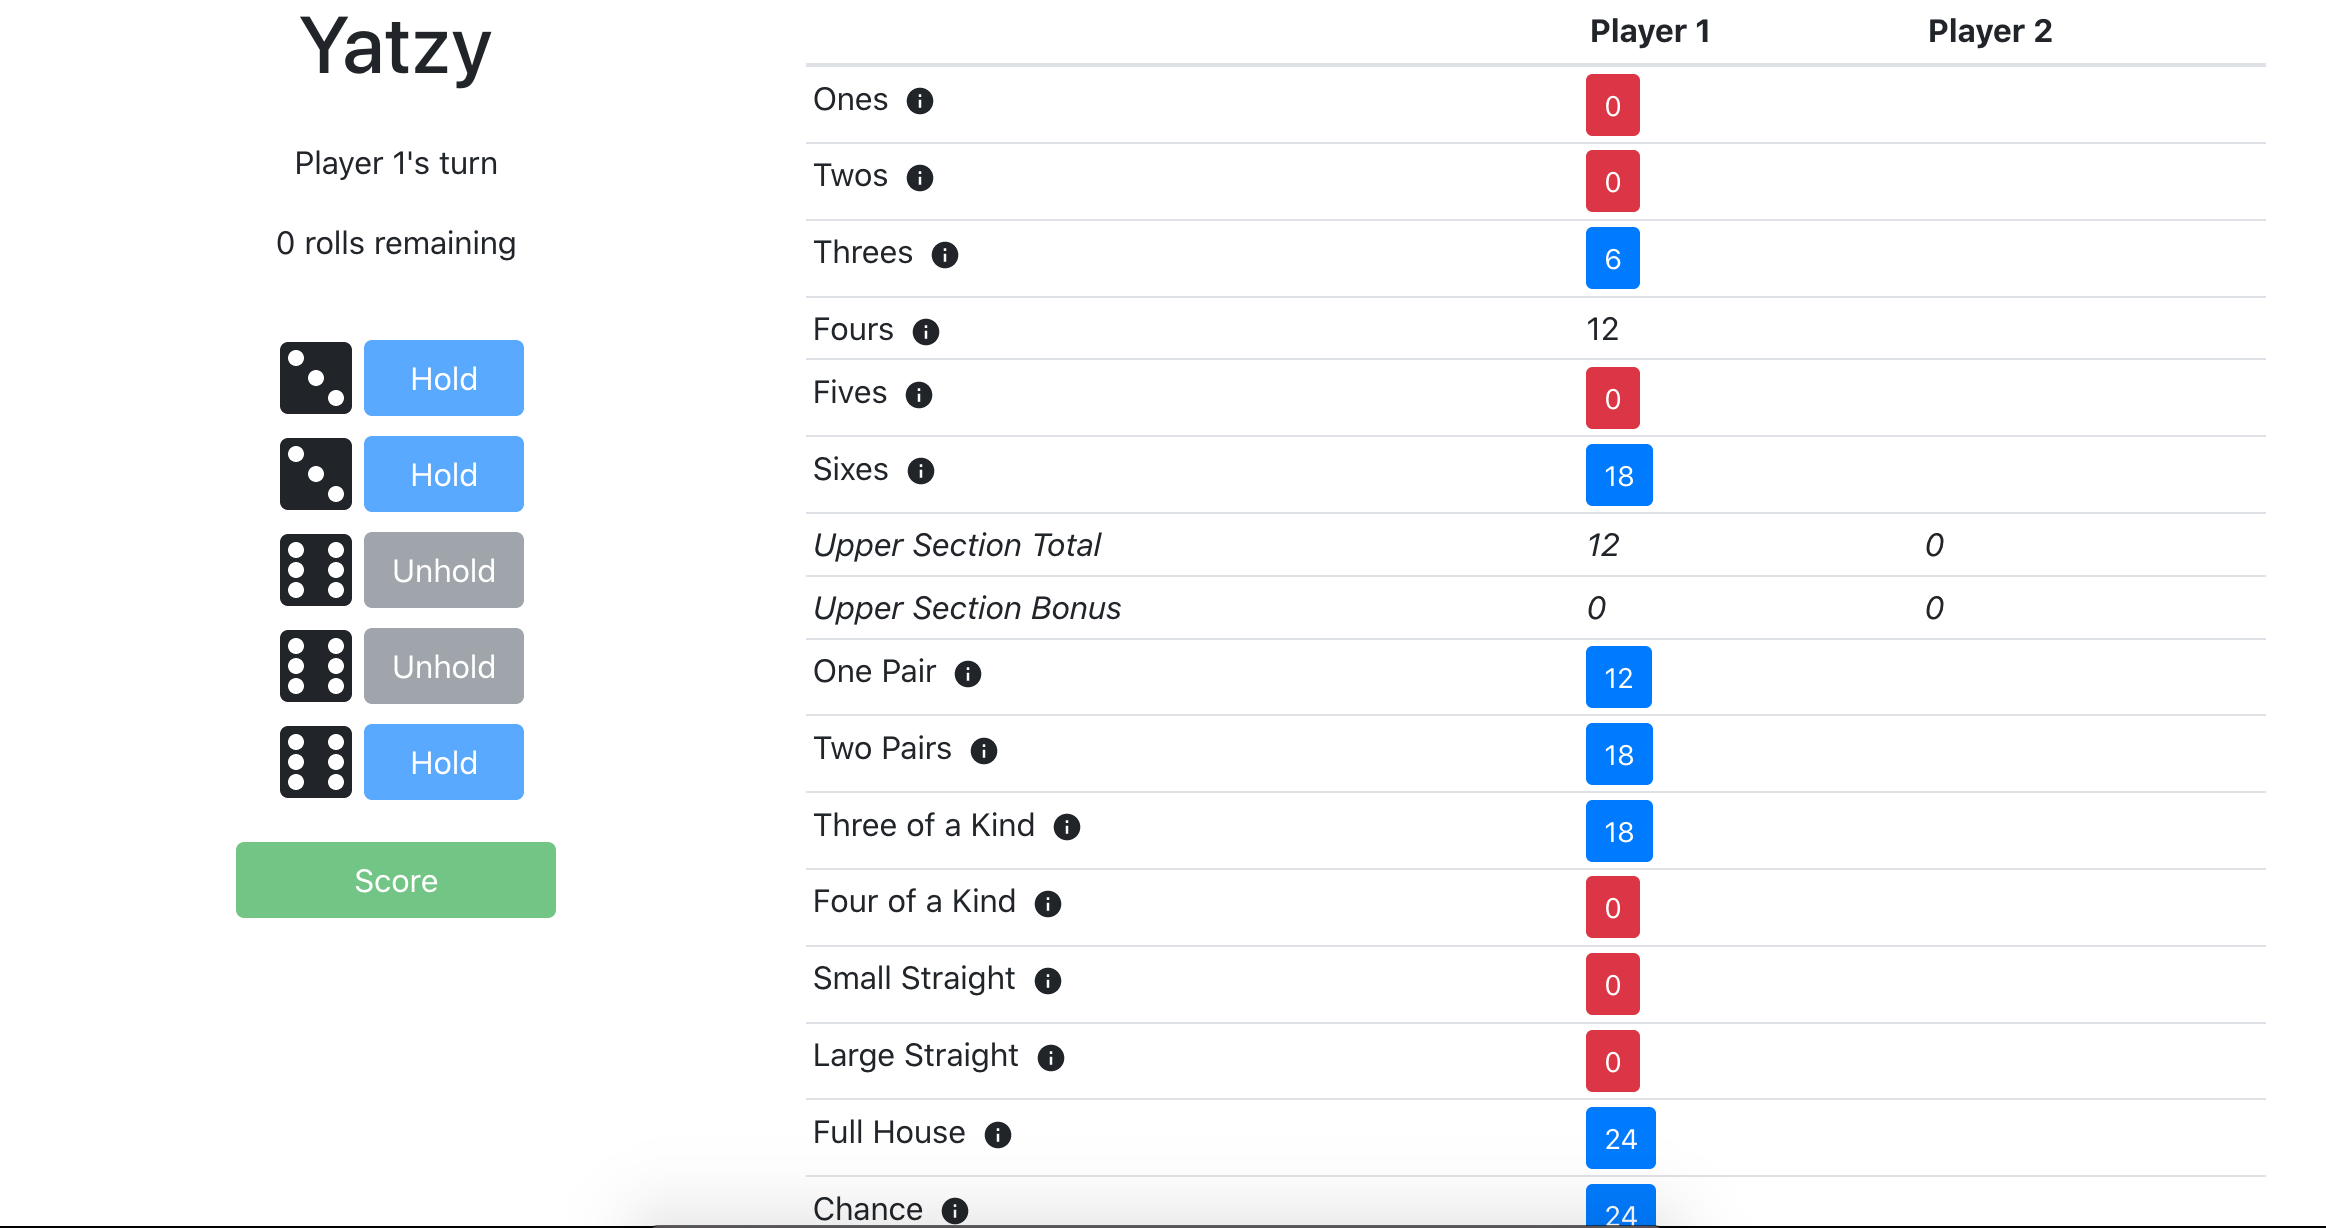
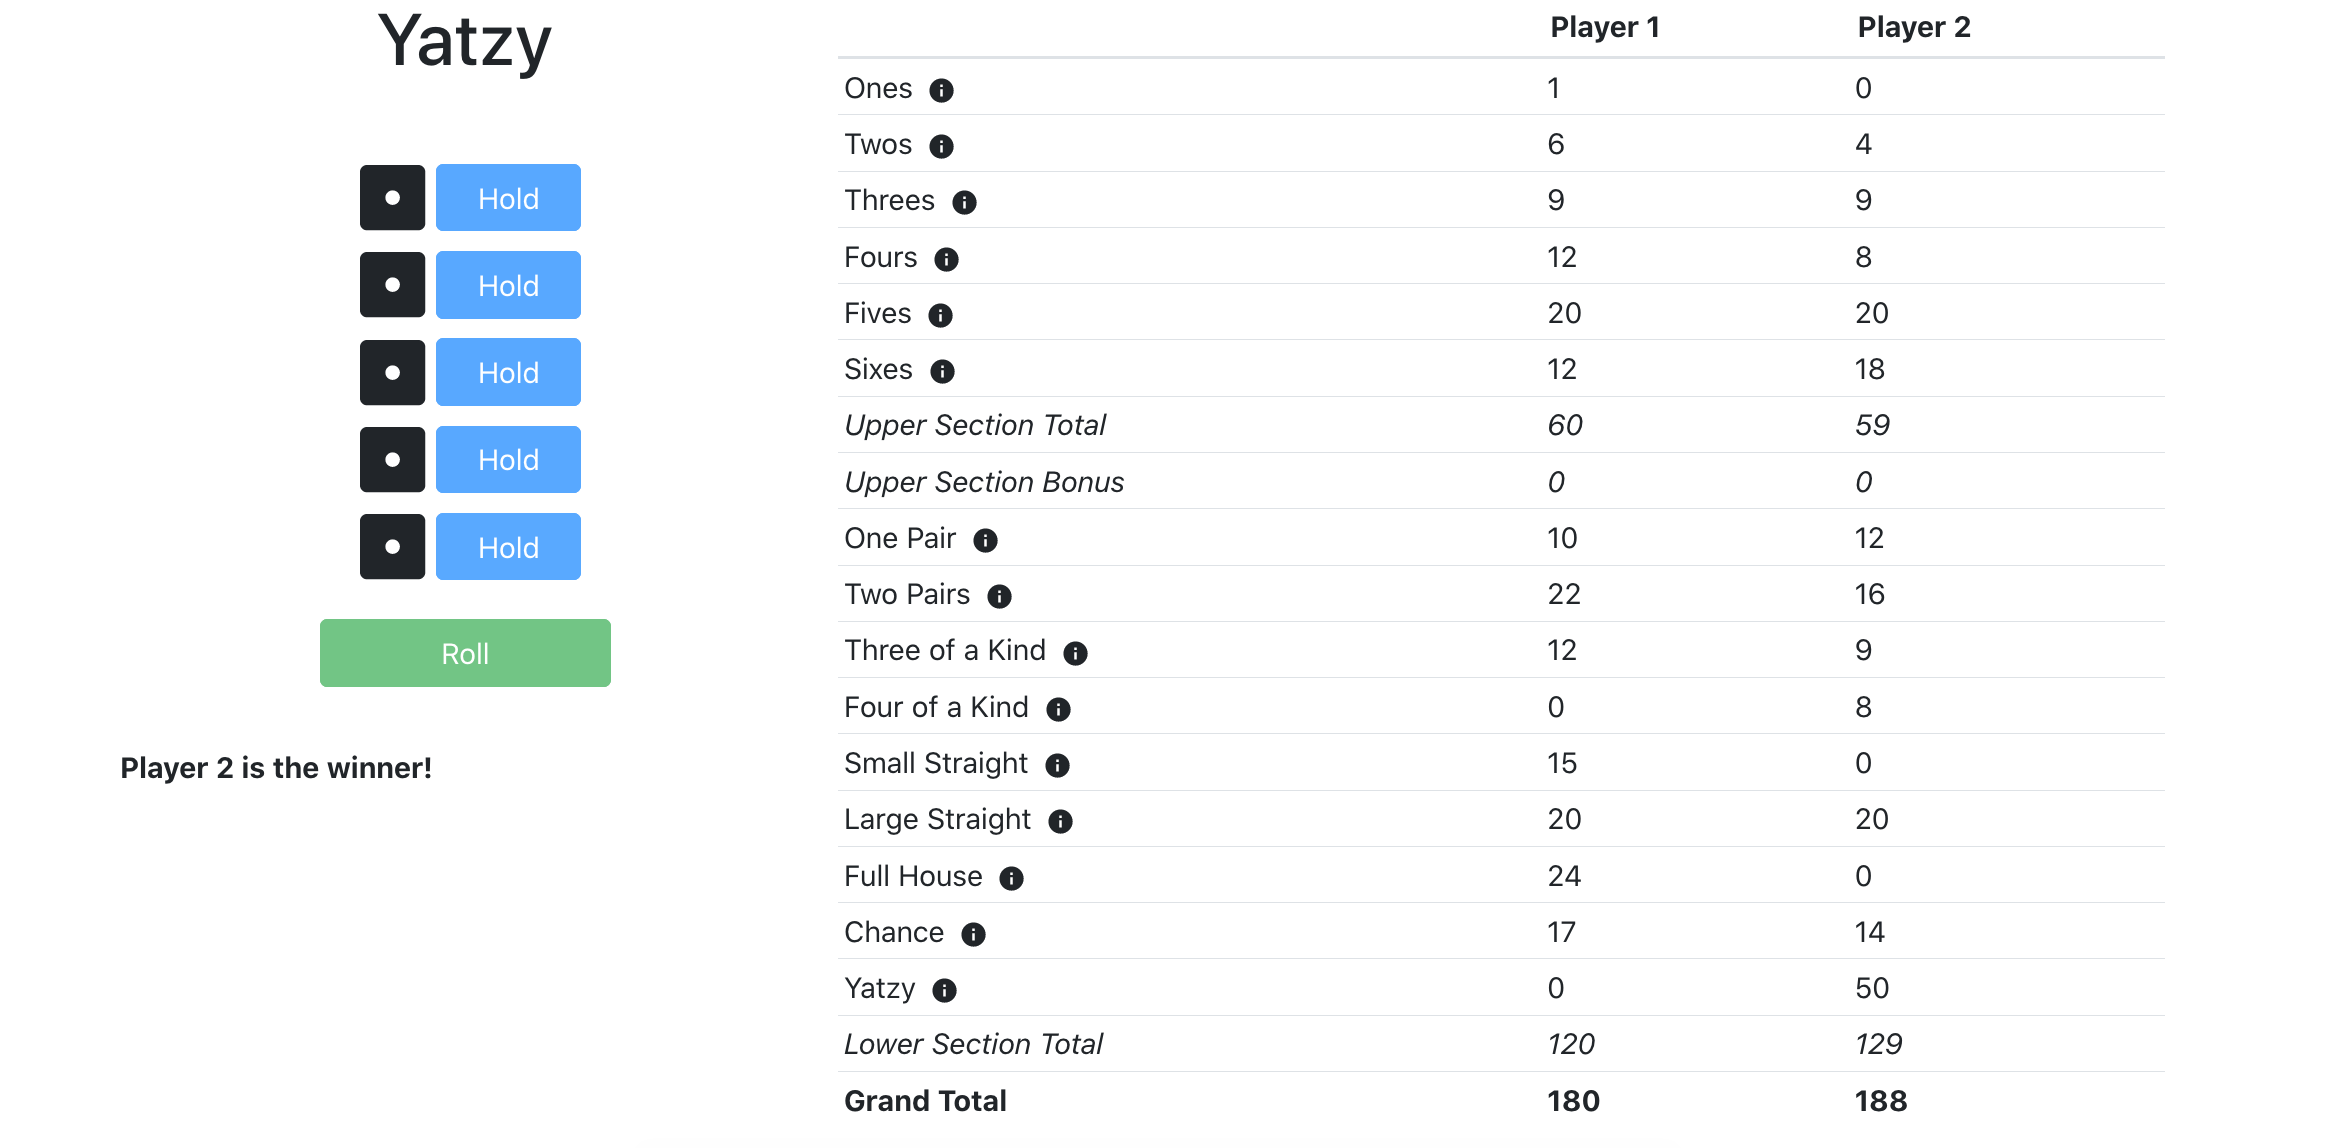
Not too bad! You can also play it yourself.
Possible improvements
Even with a completed game, there are still countless improvements that can be made and new features that can be added. Here are a few examples that come to mind:
- Online multiplayer
- Support multiple game types (e.g. Forced Yatzy or Maxi Yatzy)
- Include more instructions on how to play the game
- Provide a log of moves (what dice were rolled, where a player allocated points, etc.)
- Custom names for each player
- Computer-controlled players
- Improved UI (e.g. better mobile support, starting a new game and animations for rolling dice)
- Clean up some components (e.g. Scorecard is quite messy!)
Conclusion
I hope this guide has given you some insight into how to create your own game with boardgame.io. I would like to extend my gratitude to the boardgame.io contributors who continue to make this great framework possible.
I welcome any feedback on how to improve this guide, any questions about the framework itself and/or suggestions for new content you’d like to see in future!